|
 |
 |
Dreamweaver:
Advanced Open Browser Window v.2.0
Extension Author: George
Petrov
Download the Extension: www.udzone.net/go?197
George Petrov's new extension is one of
the best ways for opening new windows in Dreamweaver 4. It not only
offers the normal features of opening new windows such as window
dimensions, but also offers some extra features that give you more
control over the new window such as the window's position on screen.
If you want your new window to be centered or to either side of
the screen you can do so with the click of a button. You also have
control over how long the window remains open by setting the Auto
Close feature. A nifty feature in some cases.
Step 1: Applying
the Behavior to an Object
To apply the Behavior
to text, you'll need to first make that text a Null
Link. Do so by typing the pound sign (#)
or javascript: void(0) in
the link field in the Properties Inspector.
- With
either the text or the image selected, go to the Behaviors
Panel (Windows>Behaviors)
and select Advanced Open Window
2.0. Most likely this will
be the first behavior in your list.
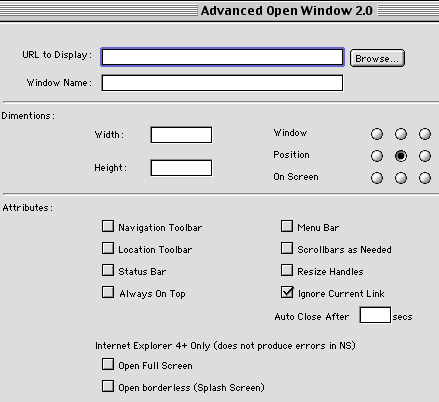
- This brings up the dialog window:
Step 2: Specifying
your new window's information
- URL to Display:
This is the location (relative or absolute) of the new window
you're opening. If it's an absolute location, type it in the field.
It's a good idea to include the "http://". If it's a
relative link you can type in the path OR better, use the "Browse..."
button to navigate to the file. Browsing for the file rather than
typing in the link will help ensure you get the path to the file
correct.
- Window Name:
It's a good idea to name the window. You can name it anything
you like. Just make sure not to include spaces or special characters.
- Dimensions: Specify the Width and Height
for the new window in pixels. If no window size is specified,
the new window will open at the same size as the window that opened
it.
- Window Position
On Screen: Select where
you want the new window to popup. Just select a radio button to
change the position.
- Navigation Toolbar:
Select this option if you want the window to display the Forward,
Backward, Stop, etc. buttons in your window.
- Location Toolbar:
This is the area that displays the path or location the page is
located.
- Status Bar:
This is the area of the window that displays information such
as load time, and custom messages appear. This is located at the
bottom of the browser window.
- Always on Top:
Selecting this option will keep the popup window in front of the
other windows. NOTE: Any forms on your popup window won't work
because the window gets selected all the time - so the fields
loose focus.
- Menu Bar:
If you check this option the new window will contain the menu
items: File, Edit, View, Go, etc.
- Scrollbars as
Needed: Selecting this option
will allow scrollbars to be present if the content in the new
window exceeds the dimensions you set for the popup window size.
If you are creating a new window that matches the same size as
its contents you wouldn't need to select this option since there
wouldn't be any content to scroll.
- Resize handles:
Select this option if you want to allow the window to be manually
resized the window by dragging the bottom right corner of the
window or by clicking on the Maximize button.
- Ignore Current
Link: If you specified a
null link by typing in "#" or "javascript: void(0)"
and don't want the main document to refresh itself, select this
option.
- Auto Close After
_ Secs: If you want the
new window to close after a set amount of time, enter a value
(in seconds) in this field.
Internet Explorer 4+ Only (Does not produce errors
in Netscape)
- Open Full Screen:
Check this option will open the new window to a size that fills
up the viewers screen.
- Open Borderless
(Splash Screen): Checking this option and your window will
open without a border or any of the menus.
|
  |
|


