Dreamweaver MX: Creating Anchor Links
Objectives: To learn how to
create and target anchor links in your web site pages using
Dreamweaver MX.
Tools & Techniques: Links,
Anchor Links, Property inspector, Point to File
Preview
final example (Test the menu links at the top of the page
and then the "Back to Top" links on the right hand
side of the page to jump back to the top of the page.)
Step 1: Getting
Started
Personally, I don't use anchor links a lot since I typically
don't design long web pages. That said, they are still very
useful and perfect for certain types of web sites. Places
I find anchor links frequently used are government sites.
For this lesson, we'll start with an HTML page that already
has content and just needs the anchors added. I'm using the
printed version of one of our Flash
tutorials.
We'll start out by adding some new links at the top of the
page and then create anchor links to each corresponding item
on the page.
Step 2: Inserting
the Anchors
Since we're creating links to each of the steps in this lesson,
I'll start by inserting an anchor link to Step 1.
- Place your cursor in front of the "S"
in Step 1. This is where the first link will jump to when
clicked
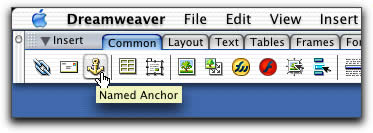
- Insert > Named Anchor or, click the Named Anchor
icon on the Insert Bar
- Enter a name for the anchor in the "Insert
Named Anchor" dialog window
- Continue adding new anchors for each of the steps or
areas in your HTML page
If you don't see the anchor after you inserted it, go up
to View > Visual Aids > Invisible
Elements to turn on your invisible elements.
Step 3: Targeting
the Anchor Links
- Once you've inserted your anchors, you're ready to create
the links
- Select the text or image to which you want to assign the
link. In this case I'm assigning it to my text links.
- Highlight the first text link by clicking and dragging
to select the entire word
- Click the Point
to File button on the Property inspector and
drag it to the first anchor you created
That's it! Just continue highlighting the remaining links,
select the Point To File button
and drag it to the next anchor.
In the Property inspector you'll notice in the Links
field the anchor link is specified. The only addition is the
pound sign (#) that is in front
of the link's name. This is the code used to target the anchor
links.
Rather than using the Point to File method to target your anchor links, you could simply click
and drag to select the text and then type in the anchor link's
name in the Property inspector.
Just be sure to type in the pound sign (#)
before you type the name.
Anchor links are case sensitive so be careful if you type
them in by hand. I typically prefer to type them directly
into the Property inspector as it's faster. Again, don't forget the pound sign before
the link's name.
|