CBT Cafe  

CBT Cafe > Fireworks > Masking

Fireworks MX 2004: Paste Inside Masking Tutorial

Version: Fireworks MX 2004, MX, 4
Level: Easy
Objectives: To learn how to place one image inside of another image using vector masking and Paste inside
Tools & Techniques: Masking, Paste Inside, vector masks, pen tool, paths, combining paths, union, scaling, special effects
Posting Date: 04.18.2004

In this example we'll take a look at using Fireworks MX 2004's vector tools to create masking and special effects by placing images into existing images.

Step 1: Getting Started

Download and unzip source.zip. This contains one PNG file with two layers: START and FINAL. The START layer is the layer we'll be working on and the FINAL layer is included for your reference.

I'm starting with the START layer which contains a main image of a classroom (mainImage) and three separate images which we'll use to place inside specific areas of our image:

  • A screen shot from our web site (image1) will be placed inside the overhead screen
  • The image of the blue bitmap (image2) will be placed over the desk to give it a metallic look
  • The image of the green rolling hills (image3) will be placed in the windows to create a different view

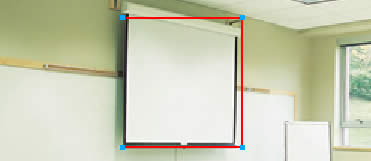
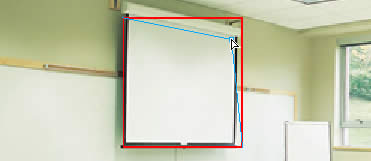
Step 2a: Creating the Vector Shapes - image1

In this step, we'll create a rectangular path around the overhead screen. It's in this path we'll place image1 to make it apear our web site is what's showing on the overhead.

We can go about creating the rectangle several ways, including using the:

For this example, the Rectangle or Pen tool will work best. We'll use the rectangle tool for this example and the Pen tool for the next two examples to demonstrate different ways to work in Fireworks.

Rectangle over overhead

Let's begin:

  1. Select the Rectangle tool and draw a quick rectangle over the overhead screen. It doesn't have to be perfect. In the next step, we'll align each of the rectangle's corner points with the overhead's corners so the rectangle path "fits" exactly over it.
  2. Click the Subselection tool and click the rectangle you just created. You'll get a warning indicating you need to first ungroup the rectangle before you can edit its points. Click OK to acknolwedge the dialog and continue. NOTE: if you didn't get a warning, you either disabled this option by previously clicking "Don't show again", or you didn't click the rectangle.
  3. Click one of the rectangle's corners and drag it it align it with the overhead's corresponding corner. Video example.
  4. Continue aligning each corner of the rectangle with the overhead screen's corners for the remaining three corners until the rectangle fits perfectly inside the screen.
Modifying rectangle's points

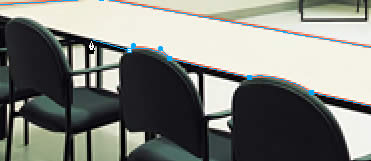
Step 2b: Creating the Vector Shapes - image2 & image3

In the last example, we used the Rectangle tool to create our vector shape around the area we want to place the new image. In this example we'll use the Pen tool to create a vector path around the table and then the windows.

  1. Select the Pen tool
  2. Set the Stroke to a contrasting color
  3. Set the Stroke Category to 1 Pixel Soft

Pen tool selection - Table
The table will be the trickiest of the objects since it involves a little extra "pen work".

Pen tool drawing path over table


  1. With the Pen tool selected, begin clicking and releasing to plot points around the table. You don't have to worry about getting it perfect the first time as we will go back and show you how to touch it up at the end. The Pen tool takes a little getting used to so don't get discouraged if your paths aren't as accurate as you would like the first time.
  2. Continue clicking and releasing around all sides and corners of the table.
  3. When you get to the curves of the chairs, click the point where the chair meets the table, hold the Alt / Control key and drag up toward the curve of the chair about 1/3 the curve, release the mouse, and click and drag a new point on the other side of the chair's curve where the chair meets the table. Video example.
  4. With the Pen tool still selected, click the Curve point you just created to delete the direction handle.
  5. Continue around the remainder of the table and chairs
  6. Close the path by clicking the first corner point you created to start the path. You'll know you're ready to close the path when you see a small "0" in the bottom right corner of the Pen cursor.
  7. Select the Subselection tool to click and drag on any of the corner points you created to modify the placement of the points as needed
Pen tool drawing curves


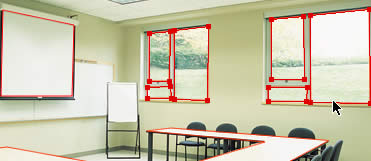
Pen tool selection - Window
The windows are easier to select since you'll only need to click and drag in each corner of the window to create your path. There are six separate window areas you'll need to create a path around. After you create them, you'll Combine the paths to make the objects act as one object.

Pen tool around windows


  1. Select the Pen tool and set the Stroke once again to a contrasting color.
  2. Click and release in each corner of the window panes to create the path.
  3. Close each path by returning the path to the starting corner point. You'll know you're ready to close the path when you see a small "0" in the bottom right corner of the Pen cursor.
  4. Continue for the remaining windows.

Step 2c: Modifying the Shape - Union

In order to use Paste Inside with multiple objects, we need to first combine them. The window area of contains multiple objects. We need to create separate paths around each of the window panes and then combine them to act as one path.

  1. Shift-click each of the six paths you created around the windows to select them all.
  2. Go to Modify > Combine Paths > Union.

You won't see any difference in the shape since all the corner points will still be visible and editable but the paths will act like one path now.

Page 1 | Page 2


Home | Dreamweaver | Fireworks | Flash | Photoshop | Elements | PowerPoint| Ebay | QuickTime Pro | Flash 5 CD | Fireworks MX CD | QuickTime Support | Contact

Copyright © 1999-2015 CBT Cafe, All rights reserved

Flash®, Fireworks™, and Dreamweaver® are registered trademarks of Macromedia, Inc. in the United States and/or other countries
Photoshop®, Photoshop Elements® and Illustrator® are registered trademarks of Adobe Systems, Inc.
QuickTime® is a registered trademark of Apple Computer, Inc.
Ebay® is a registered trademark

CBT Cafe | Multimedia Learning | Interactive Graphics