CBT Cafe  

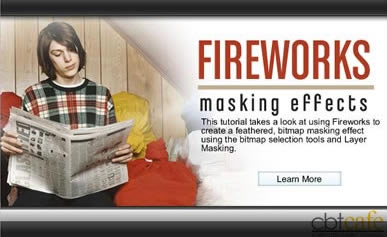
CBT Cafe > Fireworks > Selections & Masking

Fireworks CS3: Masking Effects Using Bitmap Masking

Version: Fireworks CS3 (and earlier)
Level: Easy
Objectives: Learn to use layer masks (Group as Mask) in Fireworks CS3 to create faded image silhouettes
Tools & Techniques: Masking, group as mask, selections, layer masking, feathering, editing masks, styles

This tutorial takes a look at using Fireworks to create a feathered, bitmap masking effect using the bitmap selection tools and Layer Masking.

For anyone working as an elearning designer, Fireworks is one of the best tools for rapidly creating elearning storyboards. In the final part of our lesson, we'll take our masked silhouette and create a storyboard for an elearning course on Fireworks.

Fireworks CS3 Masking

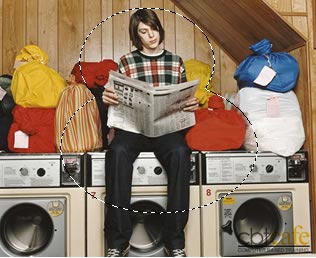
Step 1: Creating the Feathered Bitmap Selection
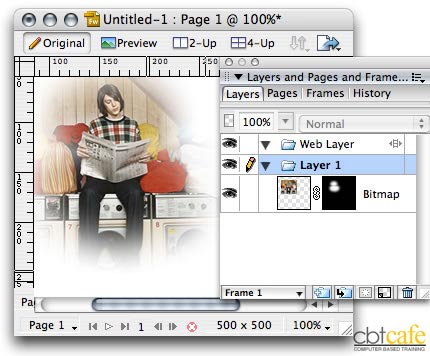
  1. Open an image in Fireworks
  2. Select the Oval Marquee tool
  3. Set the Edge to Feathering and enter a value of 45 in the Property inspector
  4. Click-drag a selection around your image.
    • To Add to the Selection, hold the Shift key down and drag another selection. This is useful when you want to create multiple selection

Fireworks Oval Selections

Step 2: Creating the Mask

There are several ways to create bitmap masks in Fireworks. In our example, we'll use the Add mask button in the Layers panel.

  1. Click the "Add mask" button at the bottom of the Layers panel

Fireworks Feathered Selection Mask

Fireworks immediately applies the mask to the feathered selection. Because we entered a high setting for the feathering, the image gradually fades to transparent allowing us to begin creating composite designs.

Step 3: Creating the Storyboard

Storyboards for elearning can be designed with any number of tools and formats. What I like most about Fireworks for elearning design is that it enables me to quickly create layouts that can just as easily be changed. And trust me, they'll change:-)

  1. Create a new canvas 450x280
  2. Place your masked object into the new canvas by:
    • Clicking and dragging it to the new canvas
    • Copying (Cmd-C/Ctrl-C) the image and Pasting (Cmd-V/Ctrl-V) it into the new canvas

Masked image on new canvas

  1. Select the Rectangle tool and create a rectangle 40 pixels high and wide enough to cover the entire canvas
  2. Apply a style to it. I used "Dark Chrome 013" to give it a highlight effect
  3. Duplicate the rectangle by clicking Cmd-D/Ctrl-D
  4. Align the new rectangle to the top of the canvas

Rectangle borders

  1. Scale the masked image up or down if needed. I needed to scale it up several pixels.
  2. Select the Text tool and type out some text

And there you have a quick storyboard for your next project. Run it by your creative director or client, implement feedback and get signoff:-)

Final masked image


Home | Dreamweaver | Fireworks | Flash | Photoshop | Elements | PowerPoint| Ebay | QuickTime Pro | Flash 5 CD | Fireworks MX CD | QuickTime Support | Contact

Copyright © 1999-2015 CBT Cafe, All rights reserved

Flash®, Fireworks™, and Dreamweaver® are registered trademarks of Macromedia, Inc. in the United States and/or other countries
Photoshop®, Photoshop Elements® and Illustrator® are registered trademarks of Adobe Systems, Inc.
QuickTime® is a registered trademark of Apple Computer, Inc.
Ebay® is a registered trademark

CBT Cafe | Multimedia Learning | Interactive Graphics