 |
|
|
CBT Cafe > Fireworks > Selections & Masking Fireworks MX 2004: Cloning to a Selected Area (placing one image into another image)Version: Fireworks
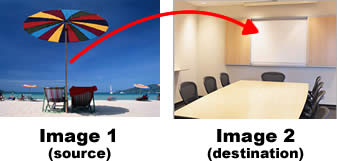
MX 2004, MX, 4 Fireworks is great. It just is. While the preferred way of working with selections and masking is with vectors, Fireworks can more than accommodate people more familiar with working in bitmap mode. In this lesson, we'll take a look at using the Rubber Stamp tool to "sample" one area of an image and place it into another image. More specifically, we'll clone to a bitmap selection on another image. This is helpful because the Rubber Stamp tool, while powerful, is not always the most graceful tool when it comes to precise selections. Step 1: Getting StartedSelect 2 images to work with. In this example, I want to take the image of the beach chairs and umbrella (Image 1) and place it inside the conference board (Image 2).
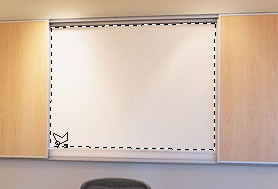
Step 2: Creating the Bitmap SelectionSince the conference board is rectangular, it's a perfect use for the Polygon Lasso tool.
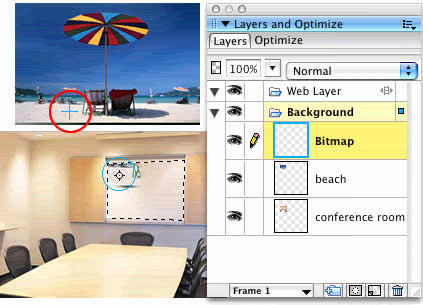
Step 3: Creating a New Bitmap ImageThis step is just good form. We don't have to create a new, empty bitmap layer but since we're working with bitmaps, it's recommended you do all you can to not edit the main image.
NOTE: If you make a mistake or want to use a different part of the first image, simply Alt/Option-click again on the first image to reset the source and repeat the previous steps.
Painting with the Rubber Stamp is trial and error and you may need to try it a couple of times until you get the area you like. You may find that you need to resize Image 1 to better match the size of the selection you created on Image 2. For example, if my Image 1 were too big, I couldn't fit the chairs and umbrella inside the small selection around the conference board. Learn More: If you liked this example and are looking for more tips and tricks like these, you should consider our Fireworks MX: Selections and Masking Techniques CDROM. The lessons apply to Fireworks MX 2004 as well.
|
|
||||||||||
| Home | Dreamweaver | Fireworks | Flash | Photoshop | Elements | PowerPoint| Ebay | QuickTime Pro | Flash 5 CD | Fireworks MX CD | QuickTime Support | Contact Copyright © 1999-2015 CBT Cafe, All rights
reserved CBT Cafe | Multimedia Learning | Interactive Graphics
|