CBT Cafe  
transSpacer

Photoshop CS3: Custom Shape Designs

Version: Photoshop CS3
Level: Moderate
Objectives: Learn to use custom shapes and layers to create special effects to images
Tools & Techniques: Custom shapes, work paths, layers, layer styles, drop shadow

QuickTime Video Tutorial

Custom shapes combined with layer styles are a great way to enhance your photos and graphic designs. In this Photoshop tutorial we'll take a look at using Photoshop's custom shapes to create layer effects.

Step 1: Getting Started

  1. Open an image in Photoshop
  2. Duplicate the layer (Cmd-J/Ctrl-J)

You should now have 2 layers: Background and Layer 1.

Duplicate Layer

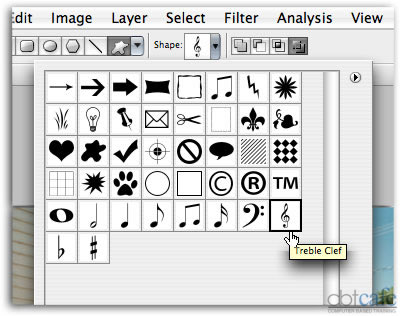
Step 2: Creating Custom Shape and Path Effects
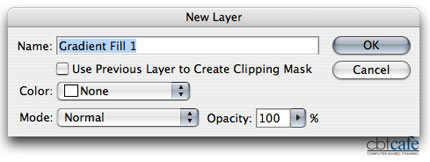
  1. Click the Custom Shape tool
  2. From the Options bar, select the options arrow to open the Custom Shapes picker
  3. Select the Shape options arrow and select the Music shapes. You'll be promoted to replace or append the shapes with your current set. Click Append to append the music shapes to your current set.
  4. Select the Treble Clef shape

Custom shape treble clef

  1. Click the Paths button in the options bar
  2. Shift-click and drag out a Treble Clef path on your layer. Shift-clicking constrains the shape while creating the work path. Select your paths palette to view your work path.
  3. Create several more work paths to fill your image
  4. Cmd-click the work path thumbnail in your Layers palette. This creates an active selection. Click the Layers tab to return to the Layers. You'll see the marching ants around your Treble Clef
  5. Create a new layer (Layer 2) from the selection by clicking Cmd-J (Ctrl-J). This places only the active selection on a new layer and deselects the selection.
  6. Add an Inner Shadow to the Treble Clefs (Layer 2) to increase the effect

Step 3: Working with Layers

We're now ready to add some effects to our layers.
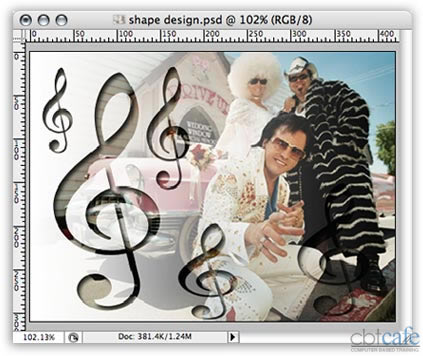
  1. Click Layer 1 to select it. This should be your middle layer.
  2. Ensure your Default Foreground and Background Colors are in order by clicking D
  3. Reverse the Default colors now by clicking X
  4. Layer > New Fill Layer > Gradient... to create a new fill layer
  5. Click OK from the pop up window to accept the layer name

New Layer

  1. The Gradient Fill dialog window opens
  2. Change the Angle from 90 to 0 degrees
  3. Click OK

The final image:

Photoshop CS3 - Final Effect


Home | Dreamweaver | Fireworks | Flash | Photoshop | Elements | PowerPoint| Ebay | QuickTime Pro | Flash 5 CD | Fireworks MX CD | QuickTime Support | Contact

Copyright © 1999-2015 CBT Cafe, All rights reserved

Flash®, Fireworks™, and Dreamweaver® are registered trademarks of Macromedia, Inc. in the United States and/or other countries
Photoshop®, Photoshop Elements® and Illustrator® are registered trademarks of Adobe Systems, Inc.
QuickTime® is a registered trademark of Apple Computer, Inc.
Ebay® is a registered trademark

CBT Cafe | Multimedia Learning | Interactive Graphics