Photoshop CS2 : Using Quick Mask to Change Eye Color
Version: Photoshop CS2
Level: Easy
Objectives: Learn how to change eye color using Quick Mask
Tools & Techniques: Quick Mask, Image Retouching
Posting Date: 04.03.06
Step 1: Creating the Quick Mask Selection
- Open an image in Photoshop CS2
- Click the Command-Spacebar/Control-Spacebar keys to bring up the temporary Zoom tool
- Click-drag a selection around one of the eyes to zoom in tight on the eye
- Select Edit in Quick Mask Mode (Q) button in the Tools palette
- Select the Brush tool and verify the default foreground/background colors are set. Click the D key to reset them if necessary.
- Adjust the Brush size so that it's smaller than the eye. You don't want to go outside the eye when you paint.
- Begin painting inside the eye. You'll notice the brush is painting with a red tint. This is the default color for Quick Mask. Keep brushing inside until you've filled up the entire eye.
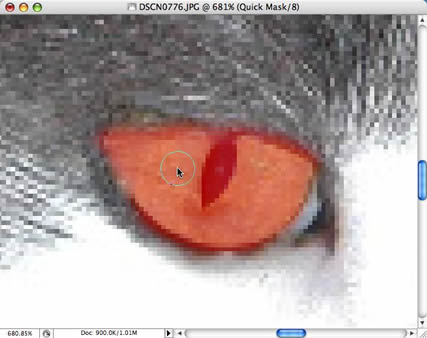
NOTE: if you paint outside the eye click the X key to reverse the foreground/background colors. You can now paint away any extra masking. When you've painted the area the way you like, click the X key again to return to the default. You can also click D to return to the default colors.
- Click the Space bar to bring up the temporary Hand tool and click-drag your image to view the other eye.
- Repeat the previous steps to mask the second eye
- Exit Quick Mask Mode by clicking the Edit in Standard Mode button (next to the Quick Mask button). This will reveal a selection around the image.
- Return to 100% view by going to View > Actual Pixels
- Inverse the selection by clicking Command-Shift-I/Control-Shift-I. You should see a selection around only the eyes now.
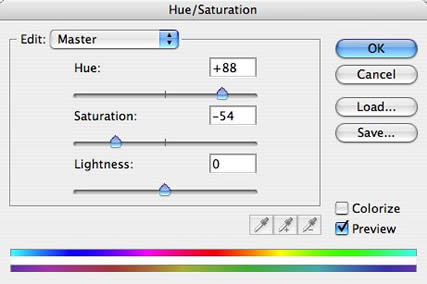
- Create a new Adjustment Layer by going to Layer > New Adjustment Layer > Hue/Saturation...
- Click OK to accept the default layer name
- Adjust the sliders to change the color of the eyes. You'll want to adjust both the Hue and Saturation sliders for the most realistic settings. Hue will adjust the colors while Saturation will adjust the amount of color used. Below are the settings I used.
- Click OK to apply the settings.
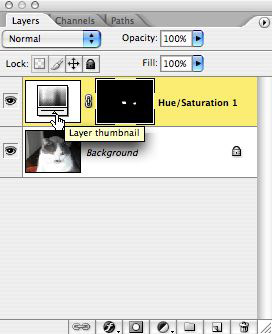
Thanks to the nature of Adjustment Layers, you can easily modify the colors.
- Double-click the Layer thumbnail in the Layers palette (the first thumbnail)
- Modify the Hue/Saturation settings
- Click OK to apply the settings.
|